Software

Windows XP Upgrade to Windows 7

Just went through my first XP to 7 upgrade for a customer and it was pretty painless. The Windows 7 upgrade package comes with a list of instructions for upgrading from XP since you cannot do an in place upgrade but basically do a complete reinstall. The recommended options include running the Windows 7 upgrade advisor to check hardware and software for compatibility and using the Windows Easy Transfer program to transfer files and settings to Windows 7. I skipped these steps since the laptop was new and rated for Vista and I had already checked the hardware specs; I decided to backup user files myself because I did not know what the transfer program might backup and what it might miss.

The next step was to insert the Windows 7 DVD while in Windows and run the install choosing custom install (not upgrade). I was told when I selected what partition to install Windows to that if there was an existing version of Windows, it would be backed up to Windows.old. The installer ran on its own until the end where you have to give some basic information about location, time, and enter the product key.

It appears all of the user files were left on there either in there own original folders under the C drive or moved under Windows.old if they were in the user folder.

So the nice thing I learned about this process was that you do not have to reformat and then put back all of the data files, even though it is still a good idea to backup beforehand just in case. Also, XP to 7 may be a lengthier process because of application reinstalls, but at least the process is laid out very well for the average user.
Paint Shop Pro and Error 1327

I tried to install Paint Shop Pro Photo X2 today on my Windows 7 Ultimate PC and ran into an error at the beginning of the installation. The error message I kept receiving was “Error 1327: Invalid Drive x:\.” I did a quick search and several people had received this message. Solutions included reloading Windows (quite ridiculous) and mapping the problem drive letter to a dummy folder. In my case, the drive is a network drive, so I tried to disconnect it to see if that would help. When it didn’t, I tried copying the installation folder to drive X and installing it from there, which also failed.

Finally, I went to Corel’s site to find an answer. The describe the problem as being caused by “a registry entry which points to a drive letter that no longer exists. The solution to this problem is to add the drive letter MSI ( Microsoft® Installer ) is looking for.  This can be accomplished by re-mapping your CDROM drive letter or adding an additional drive letter which points to your CDROM.” Well, my drive does exist, and who cares if I’ve ever installed a program from this drive. No other program installation has ever complained.

So now I decided to try my own solution to problems with setup programs – bypass the setup program and go straight to the MSI file. In this case, the MSI file is named psppx2.msi. I ran that program, and, low and behold, I had a successful installation. From this, I would say that Corel should stop blaming problems on registry entries and fix their setup program.

In summary, the solution to error 1327 in Paint Shop Pro Photo X2’s installation is to run the MSI program to install the software. The software works fine for me; it even downloaded and installed an update.

Daniusoft Media Converter Pro

While checking out the software Doubletwist (recommended by Maximum PC to remove DRM from your iTunes purchased tracks) I found out it cannot do this.  While going through Doubletwist’s support, some nice person posted information on Daniusoft Media Converter Pro.  The full version was only $39.95 so I purchased it and have been very satisfied with this product.

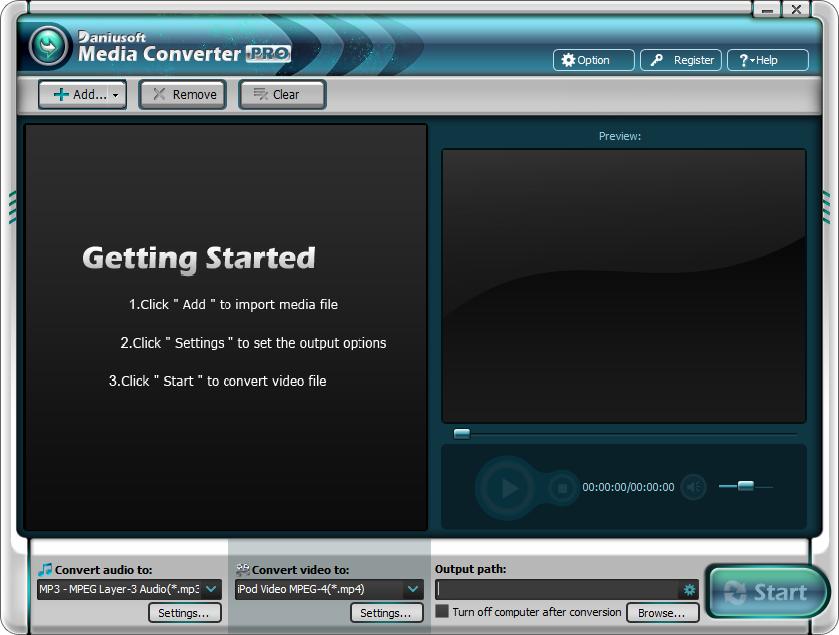
First, this product is very easy to use.   On the program interface it displays a”Getting Started” page which gives you the 3 steps to converting audio or video as pictured here:

Daniusoft Media Converter Pro interface

In step 2 before clicking settings, you would choose the audio or video format you would like to which you would like to convert your existing file(s).

One caveat is that you must have the license to the DRM media file to convert it (I assume non-DRM can be converted without a problem).  The program must convert the file while playing it because however long the file is is how long the conversion takes.  So if you have a lot of files to convert, do it while doing something else or queue them up overnight.

I have not yet tried the video conversion but the audio files sound great.  I went with 256kbps MP3 files.  I didn’t dig in to all of the settings because the program was so easy to use and workedby just following the 3 steps displayed on the screen. This program was also a lot cheaper than paying Apple again to upgrade my music to non-DRM files and I can continue to use the program for converting files in the future.

If you have a bunch of music you purchased from Apple or elsewhere that has DRM, I recommend this program to remove it so you can better enjoy your music any way you want it.

GParted

I recently came up against a problem that surfaces from time to time for me in my business.  I had a client who just bought a new server and was not happy with the partitioning of the hard drive.  It was a 1 TB drive, but the C drive was only about 40GB.  The client wanted at least twice this size for the C drive.  Since it was a new server and we had time before the installation, we were going to reload the server from scratch, partitioning it to the client’s request during the reload.

Usually when I encounter this problem of a small C drive on a server, it happens after it has been in production for a while.  20GB seemed large enough, but now with updates and program installations, your running short on space.  I’ev used Partition Magic many times before for desktop PCs, but it doesn’t work on servers.  They used to have a product called Server Magic, but this product is no longer sold.  I’ve seen some other products that you can use on servers, but they’ve always been more than I’ve wanted to spend.

So, in the case at hand, it wasn’t a big deal to reload since it was a new server.  However, I was fortunate enough to run across an article by a reader in Windows IT Pro magazine talking about a free program called GParted.  It is a Linux program available through SourceForge.net and works on both desktop and server environments.  The author mentioned using the product successfully many times on servers, and since I had a situation where if we screwed something up we could reload (the original plan anyway), I figured this would be a good time to try it out.

The easiest way to download and use GParted (the Gnome Partition Editor)is to get the iso and burn it to a CD.  It boots into a Linux environment and allows you to create, delete, resize, and move partitions.  We used it successfully to delete the large extended partition and logical D drive, resize the C drive, then recreate the extended partition and logical D drive.  It saved us a lot of time and the hassle of reloading that server.

If you need to fiddle with partitions on desktop or server computers, give GParted a try.

Malwarebytes Anti-Malware

My employee Marvin introduced me to this software and it has worked well for me in two situations and I have recommended it to others a few times as well.  The software is a free download from Malwarebytes website or you can find it in download.com’s top ten PC downloads.  It has proven to work well in removing malware, trojans, etc.

After downloading the software, run the setup file.  At the end it already checks to update itself and start the program.  After the update, you come up to the scanner tab with “Perform quick scan” already selected.  Click the “Scan” button and wait for the program to finish.  If it finds anything,  the “Objects Infected” line will show the number of objects in red.  Click the results button and remove all bad objects found.  A text log file will pop up in notepad to tell you what was done.

You can purchase a personal license for $24.95 which activates the full version, unlocking “realtime protection, scheduled scanning, and scheduled updating.”

Sony Media Reader Drive Icon Trouble

I have a Sony USB media reader connected to my XP PC.  When I had to reload my XP PC after a hard drive crash, I couldn’t find the CD that came with the media reader which installed icons and names for the 4 drives which made it easier to identify them (instead of each being named “removable drive”).  This has bugged me for a while and last night I finally decided to do something about it.

After searching for a while, I finally located the software for download on Sony’s Storage Support website.  I downloaded and installed it, but nothing changed.  I found the program and icons in C:\Program Files\Sony Icon.  The I noticed the icon files weren’t displaying their icons, but some Nero viewer icon.

So next I went crazy trying to fix my icons.  After futzing with the file types in explorer and the registry, I did some searching and stumbled across a great post by KDivad Leahcim on Annoyances.org (it’s the 6th post from the top).  I followed the instructions and they worked like a charm.

Unfortunately, my drive icons still were not showing up.  So I did more searching and found this site  which talked about removable media drive icons in XP.  He mentioned a registry key (HKEY_LOCAL_MACHINE\SOFTWARE\Microsoft\Windows\CurrentVersion\Explorer\DriveIcons) where you could set icons, but didn’t say how.  Luckily I had already renamed one of the drives and it showed up here as its drive letter (D) with a subkey DefaultLabel with a value of what I named it (CF Card).  Using a little ingenuity, I created a second key under “D” called DefaultIcon and gave it a value of “C:\Program Files\Sony Icon\sony_r_cf.ico” which is where my Sony icon is located.  That did the trick.

One more point of caution – when naming a removable drive, do it when a disk/card is NOT inserted; otherwise, Windows gives the disk/card the name, not the drive.

Even though this was a painfully long process (which kept me up way too late), I am happy to share this information from another lesson learned with my readers.

Cyberlink Blu-ray Disc Advisor

I ran across this free download while researching Blu-Ray burners.  Although it is unsupported, I had no problems installing it and running a scan of my PC.  This software answers many complaints I’ve read from people who have bought BD players or burners for their PCs and then couldn’t watch Blu-Ray movies because of a hardware or software problem they encountered after the purchase.

The software is very simple to use.  After opening the program, there is an explanation of what the software’s scan of your PC will do in general.  You are also presented with a large button to click to start the scan.  The scan takes 10 seconds or less and gives you information on basic and advanced playback of Blu-Ray discs (basic establishes whether or not you can play the discs at all).  The basic tab gives you your CPU, video card, memory, OS, video card driver, Blu-Ray drive, software player, and video connection type information.  A green circle next to the categories means you’re BD ready for that item, a yellow circle means you need to upgrade something (depending on the category) and a red circle means the category is not BD ready.  If you receive a yellow or red circle, there is an info button you can click which links to Cyberlink’s website for more information on your problem.

I like this tool because it’s free and it gives you the information you need to determine whether or not your PC’s ready to watch Blu-Ray movies.  I knew you had to have an HDCP compliant monitor, HDCP compliant video card, a Blu-Ray player/burner, and playback software, but this tool gives even more information and puts it in an easy to understand format so there’s no guesswork involved.  If you are considering watching Blu-Ray movies on your PC, check out this tool and see what you need to do to make it happen.

Auslogics Disk Defrag

As with most things in Vista, Microsoft has hidden any information when you run the built-in disk defrag, even putting it on a schedule so you never need to worry about it.  While this is a noble effort, I like a little feedback when I run software, especially diagnostic or clean-up software.  At least XP used a lite version of Diskeeper’s defrag software.

Since I had been reading about how crappy Vista’s defrag was, I figured I’d try a 3rd party alternative.  I checked on Extremetech.com and they recommended a free choice – Auslogics Disk Defrag.

A promising sign that this software works well is that I tried to run Vista’s defrag and was told my C drive did not need to be defragmented at that time; then I ran Auslogics Disk Defrag and it ran for probably 20 minutes defragging a few thousand files.  Go figure.

Auslogics Disk Defrag has a graphical picture of your drive and data shows things moving around while it works, as well as a progress bar and what file it is defragging currently.  At the end of the cycle, it provides a basic report of what it did, then asks you to purchase their BoostSpeed software to further improve your computer’s performance.  I guess that’s why they give Disk Defrag away for free.  That one screen is well worth being able to use their software at no charge.  Anyway, it sure beats uses Vista’s crappy defrag.

Problem Installing VMware Tools in Windows 98 VM

Since upgrading to VMware Fusion 2 a few months ago, I’ve been slowly opening all of my VMs which causes VMware to prompt me to upgrade them to the new version.  But like anytime you upgrade to a new version of desktop VMware products, VMware Tools needs to be upgraded (I remember similar behavior when I used to use VMware Workstation).  For some reason, I always have a difficult time installing or upgrading VMware Tools in Windows 98.  I know I’ve done it before because in this particular case, the software was already installed.  But when you tell VMware to install the VMware Tools in Windows 98, a CD is inserted but it shows up as an Audio CD.  I usually mess around with it for a little bit then decide it’s not worth messing with and move on.

This morning I already had a Windows XP VM open, but I wanted to look at something in Windows 98.  When I started Windows 98, it said it could not connect to the CD drive (because Windows XP was using it) so I said ok and it booted up.  Since the CD drive was not available, I thought I’d try the VMware Tools again and sure enough the software installed.  So for whatever reason, it is hard to install VMware Tools in 98 if the actual CD drive is connected.  Next time I’ll know to disconnect the drive  before trying to install the VMware Tools (which installs from a CD image).